Remote Access Box with SSH
Standard network engineering challenge: the necessity to support systems in a network hidden behind a NAT box. IPv6 would come in handy here, but since the standard is only decades old, one can't expect support to be widely spread. I was thinking along the lines on some VPN technology, when I found myself deciding to do things the old-school way and rely on tested and proven SSH.
The Box
Since the network contained no system yet I was keen to work with (Windows boxes, proprietary netowrk equipment, you name it), I needed some base camp to start from. We will call this the remote access box. I bought an refurbished HP T620 thin client returned from a leasing contract for 23 euros, power supply included. While it does not feature high-end specs (AMD GX-217GA 2x1.65GHz, 4GB RAM, 16GB SSD), it's fully sufficient for the intended purpose.
I chose Alpine Linux as OS to build upon, which installed as easy as one can hope for:
It booted automatically from the prepared USB stick with standard x86_64 image, and setup-alpine did its magic without complaining.
The Tunnel
After finishing the installation (OpenSSH as SSH daemon, no further software installations necessary), I was ready to set up the remote access configuration. Step one was to allow SSH access to the box using SSH keys: We'll use a dedicated user for the purpose of providing access, let's call it rtunnel. So, on the remote access box, create user rtunnel with no fancy extras:
useradd -d /home/rtunnel rtunnel
Drop your client's public key into /home/rtunnel/.ssh/authorized_keys (directory /home/rtunnel/.ssh need to be created first).
However, since the network sits behind a NAT router, the box won't be accessible over the Internet directly, we will go into the opposite direction.
I already run a server on the public Internet which is accessible via SSH.
We will call this the relay server.
On the relay server, I again created a user which we'll use to establish an SSH connection and call it rtunnel for the sake of consistency.
This time, however, rtunnel will have the login shell /sbin/false (or whatever the equivalent is on the Linux distribution of choice), which limits its capabilities to creating an SSH connection, but denies terminal access.
useradd -d /home/rtunnel -s /sbin/false rtunnel
Again, we prepare setting up an SSH connection, this time on the relay server.
On the remote access box, we create an SSH key (ssh-keygen -t ed25591), the public part of which is placed in /home/rtunnel/.ssh/authorized_keys on the relay server.
In the relay server's SSH daemon, TCP forwarding is enabled by setting the keyword AllowTcpForwarding in /etc/ssh/sshd_config to yes.
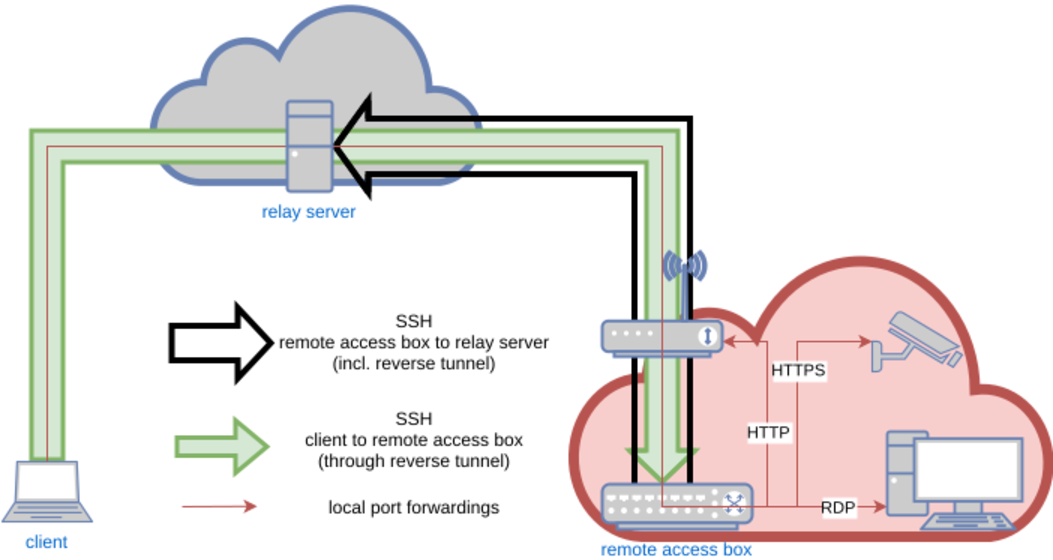
This setup allows establishing whats called a reverse tunnel.
An SSH connection is setup from the remote access box to the relay server, which will allow to use this connection backwards to access the remote access box from the relay server.
This is made possible by remote port forwading.
On the remote access box, the SSH client configuration file (~/.ssh/config) looks like this:
Host                    rtunnel
Hostname                relay-server
Port                    22
User                    rtunnel
IdentityFile            /root/.ssh/id_ed25519
ServerAliveInterval     60
ServerAliveCountMax     5
RemoteForward           22022 localhost:22
ForkAfterAuthentication yes
SessionType             none
The port chosen as first argument to the RemoteForward variable can be chosen freely, but will become important later.
For better reference, we will remember this one as the remote forwarding port.
The keyword ForkAfterAuthentication tells the SSH connection to go into background right after the connection has been established and authenticated, SessionType none means no interactive session is being enabled (which wouldn't be allowed due to the login shell /sbin/false of user rtunnel on the relay server anyway).
ssh rtunnel on the remote access box and the magic begins.
This established an SSH connection from the remote access box to the relay server which vanishes into background immediately.
However, ss -ltnp on the relay box yields what we're after:
LISTEN 0  128  127.0.0.1:22022  0.0.0.0:*  users:(("sshd",pid=2743203,fd=11))
LISTEN 0  128  [::1]:22022      [::]:*     users:(("sshd",pid=2743203,fd=10))
Port 22022 (the remote forwarding port) is now locally bound on the relay server.
Connect to this port from the relay server using SSH (ssh -p 22022 localhost), and we end up... on the remote access box!
What is happening here? Using remote port forwarding, we establish an SSH connection from the remote access box to the relay server, which uses port 22022 on the relay server to connect it to the SSH daemon on the remote access box through the SSH connection itself. This way, we can connect outbound from the remote access box (because NAT won't let us connect inbound), and use this very connection to turn things around and go back in.
Now, before this will be of any practical use, there are two rough edges we still need to smoothen: First, we need to persist the reverse tunnel in case of network disruptions. And second, connecting to the relay server first to be able to jump from the remote access box from there seems a bit clunky.
Persisting the reverse tunnel is easily done by creating a cron job, which will run:
/bin/pidof ssh || /usr/bin/ssh rtunnel
This is some rather simple approach, but it does the trick: Whenever the SSH process vanishes for whatever reason, the connection will be restarted. I set this cron job to run ever 5 minutes, so after connection failures or reboots I will have to wait 5 mins max for the connection to reappear.
Now, let's turn to the client side.
The client
In order to access the remote access box directly from a client (given SSH access to the relay server in the first place), we leverage a feature of SSH called a jump host.
A jump host is an SSH box which is used as an intermediary in the connection to the final SSH destination.
This works by naming the jump box for the connection, making SSH connecting to the target by establishing a connection to the jump box first and connecting to the target box from this jump host afterwards.
In this case, this means that we will use the relay server as the jump host, forwarding the connection to the relay server's remote forwarding port itself.
The configuration in the clients ~/.ssh/config looks like this:
Host		    remote-access-box
Hostname	    localhost
Port		    22022
User		    rtunnel
IdentityFile	.ssh/id_rsa
proxyjump	    relay-server
We define a connection to localhost on port 22022 (the remote forwarding port).
But since we use the relay server (to which we already have a connection defined in the configuration file) as a jump host (keyword proxyjump), this actually means port 22022 on the relay server, not on the client.
This lets us finally create an SSH connection to the remote access box "directly", simply by typing ssh remote-access-box.
While this is in itself nice trick, SSH let's us do more: Access devices on the target network using the established reverse tunnel.
By appending the keyword LocalForward to the Host definition of remote-access-box, we can connect local ports on the client to arbitrary ports of any device on the remote network.
The line
LocalForward 8000 192.168.2.1:80
lets us provide access to a web server running at 192.168.2.1 on the target network via port 8000 on the client.
Opening a web browser on the client and typing http://localhost:8000 in the address bar will show you the web site served by said web server.
Magic!
This can be done multiple times by separate LocalForward lines, giving access to multiple devices on the target network via HTTP(S), SSH, RDP, you name it.
Finally, we have provided access to the remote network in all the flavors required, all using just the power of SSH!
Troubleshooting
This setup is working pretty well for providing access to a network "hidden" behind a NAT from within. Whenever a reboot of the remote access box or a network hickup of some sort results in termination of the SSH connection from the remote box to the relay server (which provides the reverse tunnel), the connection is re-established by the controlling cron job.
However, I noticed that, from time to time, another disrupting condition occurs: The SSH connection from the remote box to the relay server is still established, however, the remote forwarding port on the relay server has vanished, meaning the reverse tunnel has somehow broken down. This situation will not automatically fix itself, since the underlying SSH connction is still intact and therefore, the cron job on the remote access box has no business re-establising the connection to bring up the reverse tunnel again.
While I'm still unsure why this is happening in the first place, we can still take measures to fix this: A second watchdog cron job is installed, this time on the relay server. This watchdog check if the SSH connection from the remote access box to relay server is still established and if it is, if the remote forwarding port is still bound:
tunnel='rtunnel:22022'

for t in $tunnel
do
        user=${t%:*}
        port=${t#*:}
        if [ -n "$( /usr/sbin/pidof "sshd: $user" )" ]
        then
                if [ "$( /usr/sbin/ss -ltnp | /usr/bin/grep -F $port | /usr/bin/wc -l )" -eq 0 ]
                then
                        /usr/bin/kill $( /usr/sbin/pidof "sshd: $user" )
                fi
        fi
done
If the tunnel is there but the port isn't, the script will kill the corresponding the SSH process, forcing the watchdog cron job on the remote access box to bring up the whole connection, including the reverse tunnel, again.
Put in a cron job that runs every 5 minutes, a failed reverse tunnel will be up and running again in under 10 mins.
(As always, pay attention to reference all binaries used in the script by their full path to ensure correct funcionality when used in a cron job.)
The variable tunnel at the beginning of the script allows for a whitespace-separated list of SSH user names and associated remote forwarding ports (itself separated by a colon) to support connection from multiple remote access boxes to the same relay server using distinct SSH user names and remote forwarding ports.
Working around annoyances of "modern" technology
As a infosec guy, I appreciate vendors taking security measures on their product beyond the bare minimum. However, when a vendor is not able to distinguish between a proper security measure and a snake-oil measure the is worthless from a security and simply annoying from a usability perspective, this appreciation rapidly vanishes. In security, there is no trying.
A popular trick in the realms of router manufacturers seems to be to check the Host header on requests to the web interface of their product and denying access if these do not match the expected value.
I can only interpret this as a security measure gone amateurish wrong.
The local port forwardings on the SSH connection established from the client to the remote access box allow us to access all sorts of devices on the remote access box's network.
The LocalForward keyword in the client's SSH config file should enable us to access the web interface of the router 192.168.2.1 on the remote network via HTTP by typing http://localhost:8000 into the address bar of the browser of our choice on the client.
However, the Host header checking on the router means this technique doesn't work any more.
As this HTTP connection now has a Host header with value localhost, the connection fails, presumably because the router expects this value to be 192.168.2.1.
Access to the precious web administration interface has been prevented to the pesky hacker screwing around with dubious SSH connection, advanced ecurity ftw, right?!? Not quite.
A quick check using curl reveals that Host header checking is indeed the culprit here:
curl http://localhost returns curl: (52) Empty reply from server, indicating the server is reached, but refuses to speak to us.
However, curl -H 'Host: 192.168.2.1' http://localhost:8000 returns
<HEAD><TITLE>302 Document moved</TITLE></HEAD>
<BODY><H1>302 Document moved</H1>
This document has moved <A HREF="/html/login/index.html</A>.<P>
</BODY>
showing that everyting the router cares about is the correct Host header value in order to allow access to it's valuable inner workings.
Since the Host header (or rather, any header in the HTTP connection) is entierly conntrolled by the client (as just shown), several tools exist the can alter the header values in flight.
While this would be a viable way to outsmart those clever router vendors, it is still way too inconvenient, which makes us turning to classic networking techiques again.
Enter iptables.
On the client, we build a destination NAT rule converting connections initiated with host 192.168.2.1 on port 80 to localhost port 8000:
iptables -t nat -A OUTPUT -d 192.168.2.1/32 -p tcp -m tcp --dport 80 -j DNAT --to-destination 127.0.0.1:8000
Now, typing http://192.168.2.1 into the browser's address bar (which sets the Host header to the expected value of 192.168.2.1) actually connects to localhost:8000, which through the series of SSH connections and port forwardings again connects to host 192.168.2.1 on port 80.
Correct Host header, correct network target, access granted!
Conclusion
It is fairly possible to persist remote access to a network sitting behind any sort of NAT using ridiculously cheap hardware and Linux out-of-the-box utilities. The only actual requirement here is a publicly accessible server with SSH access as a mediator. While using tools specifically designed for this kind of scenario, such as Tailscale, might provide a more convenient and managable experience, this setup provides a good exercise in networking techniques, proves robust and might in addition be a workable solution in edge cases where restriction like e.g. the inablitily of installing additional software or the presence of firewalls.
Moreover, it beautifully shows that SSH is the threesome love child of networking, cryptography and pure magic.